I made my first three landings today! (That’s three separate landings, not one landing where I bounced twice.)
The plan for today’s flight was to fly over to the practice area (the Wachusett Reservoir, north of Worcester, MA) and have me work on ground reference maneuvers. These maneuvers include:
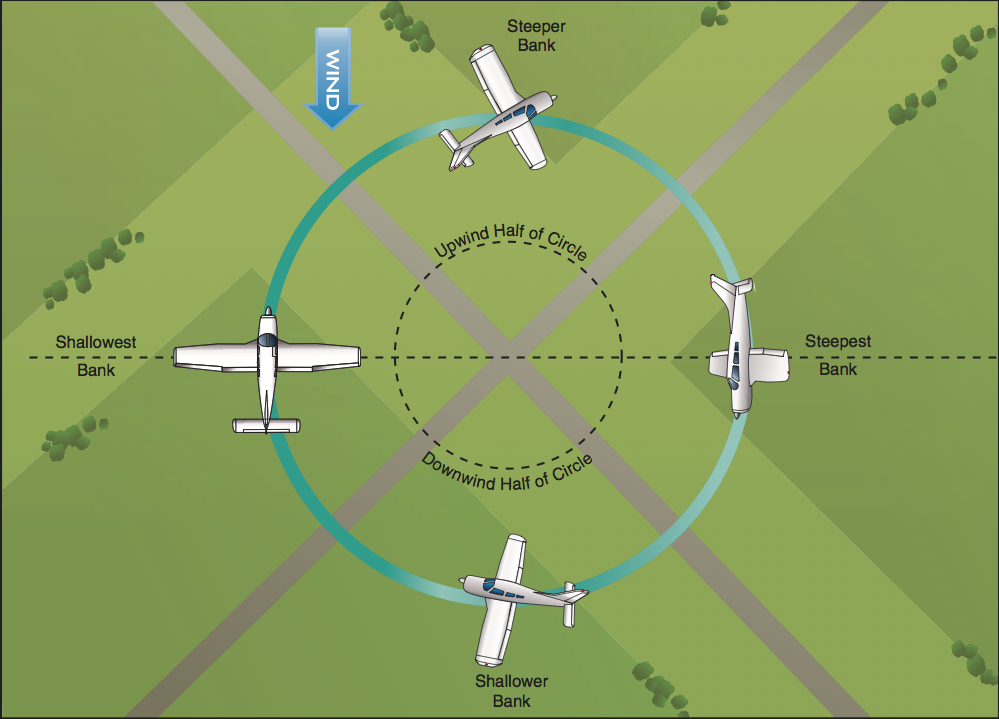
- Turns around a point. Here you fly 1-mile-diameter circles around a fixed point on the ground while holding an altitude of exactly 1000 feet above ground level. Flying in a circle is harder than it sounds because you have to constantly adjust your bank angle to account for wind; imagine trying to drive a motorboat in a perfect circle while on a river flowing at 15 MPH. The technique you use is (a) make steeper turns when you are in the part of a circle where the wind is behind you, and (b) make shallower turns when the wind is ahead of you:
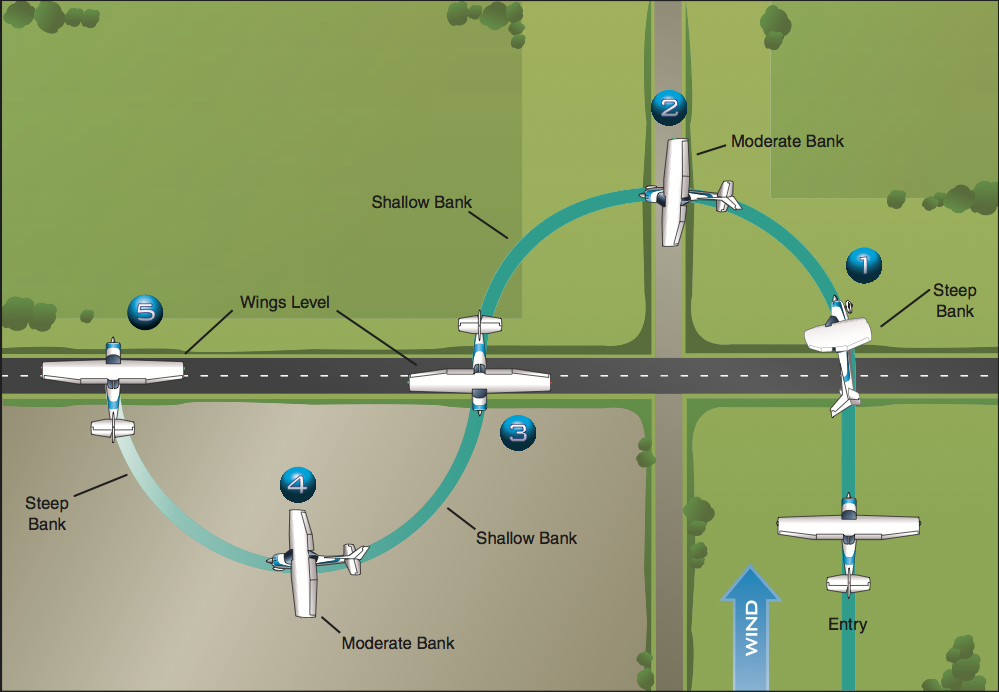
- S-turns across a road. Again, the key point is correcting for wind by changing the steepness of your turns throughout the maneuver:
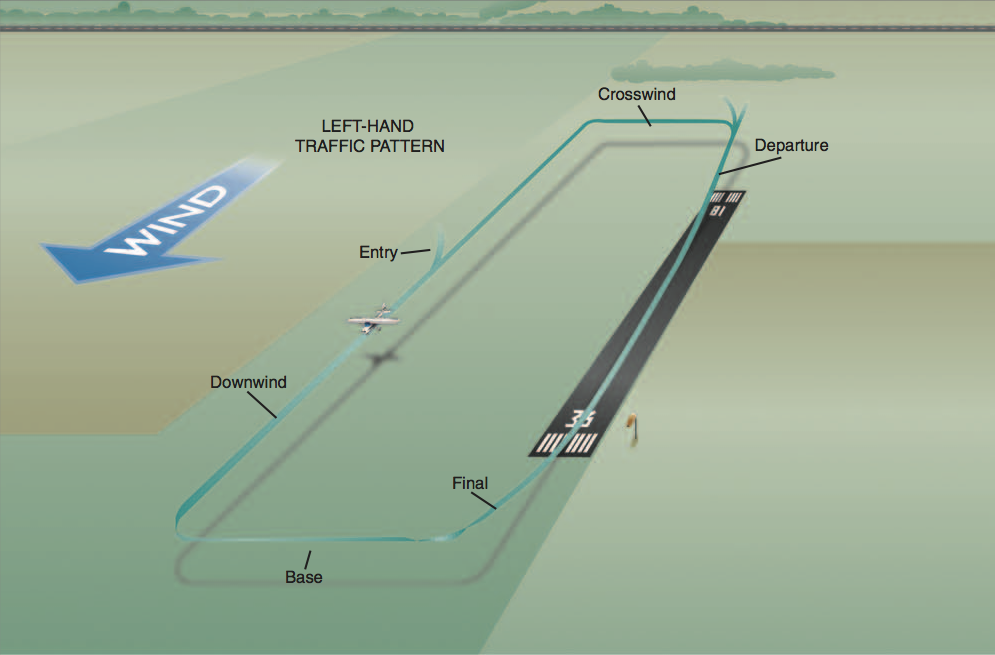
- The rectangular course. This maneuver is especially important because it mimics the turns you (and other airplanes) make when flying around a runway before landing. Not surprisingly, the key point is correcting for wind:
For longer descriptions of the maneuvers, and the theory behind them, see chapter 6 of the FAA’s Airplane Flying Handbook.
We also practiced steep turns with bank angles greater than 30 degrees. At 45 degrees we experienced a 1.5G force and at 60 degrees it was a 2G force. WOW was that fun! (My instructor knows of my interest in aerobatic flying and mentioned that I will eventually have even more fun pulling 3G and up during aerobatic maneuvers.) The objective of a steep turn is to make a 360 degree turn, exiting the turn on the same heading you start with, all while maintaining the exact same altitude (3000 feet for today’s practice). Maintaining altitude is especially challenging during a steep turn; the plane naturally wants to descend whenever you turn because the lift from the wings no longer points straight up.
When we took off the weather was good but snow was quickly moving in on the horizon, making us worry that the flight would have to be cut short. My instructor even made sure to bring the materials he needed in case visibility dropped too quickly, in which case he would need to take over to make an instrument approach and landing at the airfield. After an hour of practice the weather conditions were still okay but my instructor gave me the choice of continuing to fly in circles or to head back to the airport to try a few landings. Well, duh!
Part of flight training is to learn how to interact with air traffic control so as we neared the airport I made initial contact with the tower: “Hanscom Tower, Cessna one one five four golf, ten miles west, for touch-and-go, with charlie”. This phrase identifies who we’re contacting (the control tower), who we are (a Cessna brand aircraft with tail number N1154G), where we are (about 10 miles west of the airport), and what we wanted to do (land at the airport then immediately take off again for another practice landing). After this initial contact the instructor took over the rest of the conversation with ATC so that I could focus on flying the airplane and preparing to land without being distracted by the radio.
Neat tidbit: To return to the airport from the practice area we use Walden Pond (yes, the Walden Pond) as a visual navigation guide — we fly east until we’re directly over the pond, then make a left turn toward the airport’s control tower. The pond is easy to identify from the air and lines us up at the perfect angle for how ATC wants us to approach the airport.
When we approached the airport we didn’t fly directly towards the runway; instead we flew a partial loop around the runway called the traffic pattern. The traffic pattern helps organize multiple planes when they are all trying to land at the same time. In the figure below, we started at the “Entry” label (flying in from the left-hand side of the picture), then flew a U-shaped loop while slowly descending (“Downwind”, “Base”, and “Final”) until we were right above the numbers at the end of the runway:
As we got closer and closer to the numbers I kept expecting my instructor to announce “I have the airplane” and take over the controls from me. But he never did! He made occasional suggestions at various points — reduce power to increase the descent rate, pitch the nose of the airplane down to gain a little extra airspeed — then all of a sudden he said “okay, start the flare now” and moments later we sank down onto the main wheels in what I consider to be one heck of a pretty darned good landing for my first attempt.
After we settled down onto the runway he instructed me to add full power and we took off again for another circuit around the traffic pattern and another landing. I found it surprisingly challenging to try to fly a rectangle that looks exactly like the diagram above; for example, my turns ended up not being sharp 90-degree angles, and instead of a nice smooth descent during the “Base” and “Final” phases of the traffic pattern my descents tended to alternate between “not descending” and “descending too quickly”. Nonetheless, we made it around the pattern and, with my instructor’s coaching, I executed another pretty good landing. I made a small error during the flare — I pulled back too abruptly on the control stick — meaning that we floated up too high and had to correct for that (by adding a little power while holding a pitch-up attitude) to keep from coming down too hard on the wheels.
The third and final landing wasn’t great per se but we and the plane all made it down intact. I made several errors:
- I came in too high for the landing. Coming in too high was a problem in all three of my landings; each time I started my descent at what I thought was the correct time, but I still ended up much higher than I expected to be by the time we crossed the threshold of the runway. As I tried to correct our height on the third landing I ended up causing the airplane to go faster than the desired airspeed (the desired speed is about 80 MPH) as we neared touchdown. We were ultimately able to burn off the excessive speed before landing (runway 29 at KBED is 7,011 feet long and the Cessna 172 only needs a fraction of that to land, so we just floated above the runway for a few moments while the plane slowed down) but I definitely need to work on controlling my altitude on future flights.
- By this time the meteorological conditions were deteriorating and there was an increasing amount of crosswind (wind across the runway) that I was supposed to correct for using the rudder, in order to make sure we were lined up exactly with the runway at the moment we touched down. I didn’t use the rudder correctly so we weren’t exactly lined up straight when we touched down.
- At the moment that the main (rear) wheels touch down, any pilot will be pulling backwards quite a bit on the control stick in order to keep the airplane’s nose pitched up. This pitch-up attitude allows the plane to slow down naturally and causes the nose wheel to slowly lower to the ground. After touching down the final time I released my back-pressure too quickly, meaning that the nose came down more quickly than desired.
- As we slowed down on the runway I applied the brakes too aggressively and not completely in tandem, causing us to swerve a little bit as we continued down the runway. The gold standard is to apply gentle pedal inputs whenever you’re careening down the runway at 75 MPH.
Still, we and the plane all made it down intact. For the next hour I grinned from ear-to-ear from having flown the maneuvers and especially from having landed the airplane. During the post-flight brief my instructor conveyed that he was impressed with my performance throughout the flight (although he pointed out the above problems, and also noted that I need to work on applying better back-pressure to the control stick near the end of the takeoff roll). Overall it was a great day.


