Every few weeks we find ourselves driving in the nearby neighborhood where we lived last year, usually to visit Boloco or Zenna Noodle Bar or one of those ubiquitous self-serve yogurt places that are proliferating like 1990s-era Starbucks. The drive through invariably takes us by the apartment we used to rent on the ground floor (of four, plus basement) of a gorgeous building in a great location. But what a strange feeling it is to see our old apartment form outside: It’s a place that invokes memories of home…yet, after less than a year, it’s a place that feels inaccessibly distant. Did we really used to live there?
(In terms of inaccessibly distant memories, even worse are the places we lived before moving up here to the craggy hills of Massachusetts. I’ve recently visited friends who live near our former Florida house and friends near my former Maryland apartment. And I was stunned at how those places don’t even look like what I remember them looking like. Yikes.)
Still, we have no regrets at having switched from making monthly lease payments to a faceless landlord in California to making monthly mortgage payments to a faceless bank in Ohio.
Along those lines, here are some of my recent lessons in homeownership:
- Read the Deed (or: just because you hired a lawyer doesn’t mean you don’t need to check his work).
We just discovered that the closing attorney made four errors in closing our house. (I’d been aware of three errors but dug up a fourth this week.) Here are the errors from least severe to most:
1. The attorney miscalculated our share of the property tax. When you buy a house you reimburse the seller for some of the property tax that’s already been paid. In our case the seller had already paid taxes for the period April 1–June 30, so we needed to reimburse him for the period June 15–30 (we closed on June 15). The attorney calculated the wrong amount. But it was only a $15 error (“chump change”, as my former racquetball partner would have said).
2. The attorney miscalculated the size of our required monthly escrow payments by $180/month. So every month we’re paying an extra $180 unnecessarily into our escrow account (beyond the amount that is needed to fully pay our property tax and insurance premium) — a $1,620 overpayment so far, and growing. Once a year our mortgage servicer is supposed to recalculate the required monthly escrow payment, so I do expect to get the money refunded sometime late this year. But in the meantime, we have $1,620 less in our bank account. What’s most annoying to me is that I pointed this error out the day before closing (we only received the draft settlement statement at 4:26pm the day before our 10:00am closing) but the attorney didn’t bother to fix it.
3. The attorney made two errors on our Massachusetts Declaration of Homestead: a misspelled property address and an invalid signing date (May 15 instead of June 15). I worried that these scrivener’s errors could invalidate the document — in a worst-case scenario, an invalidated declaration of homestead could put up to $375,000 of our home equity at risk — so I had the attorney file a replacement declaration with the correct address and new date. To the attorney’s credit, his office paid the $35 filing fee for the second filing.
4. The doozy: The attorney misprepared the deed to the property! In Massachusetts there are three main ways to co-own real property. If you are married you generally want to take title as tenants by the entirety; we certainly did, and the attorney confirmed our choice over a month in advance. But the deed he prepared and filed gives us title as tenants in common. Argh!
The deed currently reads:
I, [the seller], in consideration of [the sales price], grant to JOHN GRIFFIN and EVELYN GRIFFIN of [address] with quitclaim covenants…
It should instead state:
…grant to JOHN GRIFFIN and EVELYN GRIFFIN, husband and wife, as tenants by the entirety, of [address]…
Argh indeed. The solution is for us to deed ourselves the property, inserting that phrase into the new deed. Again to the attorney’s credit, his office is eating the $125 cost of the second filing. (I asked whether filing a new deed would have any impact on our title insurance policy, homestead declaration, mortgage note, or our filings with the IRS. His answer is “no”, since the new deed won’t change the parties involved in ownership — just the form of tenancy.)
I discovered the problem when I compared our deed to the deeds of other married couples we know, and looking up the discrepancy in the relevant statutes.
- The washing machine sounds like a jackhammer!
Whenever we ran a load (in the LG high-efficiency front-load washer) with warm or hot water, the house piping rattled like a jackhammer and the washer’s intake hoses vibrated so strongly that I was worried that it would dent the wall behind the washer. A quick search of the Internet led me to diagnose a rapid-fire water hammer effect, likely due to the washer rapidly opening and closing the hot water valve in a misguided attempt to regulate intake temperature. And there’s a cheap and easy fix:
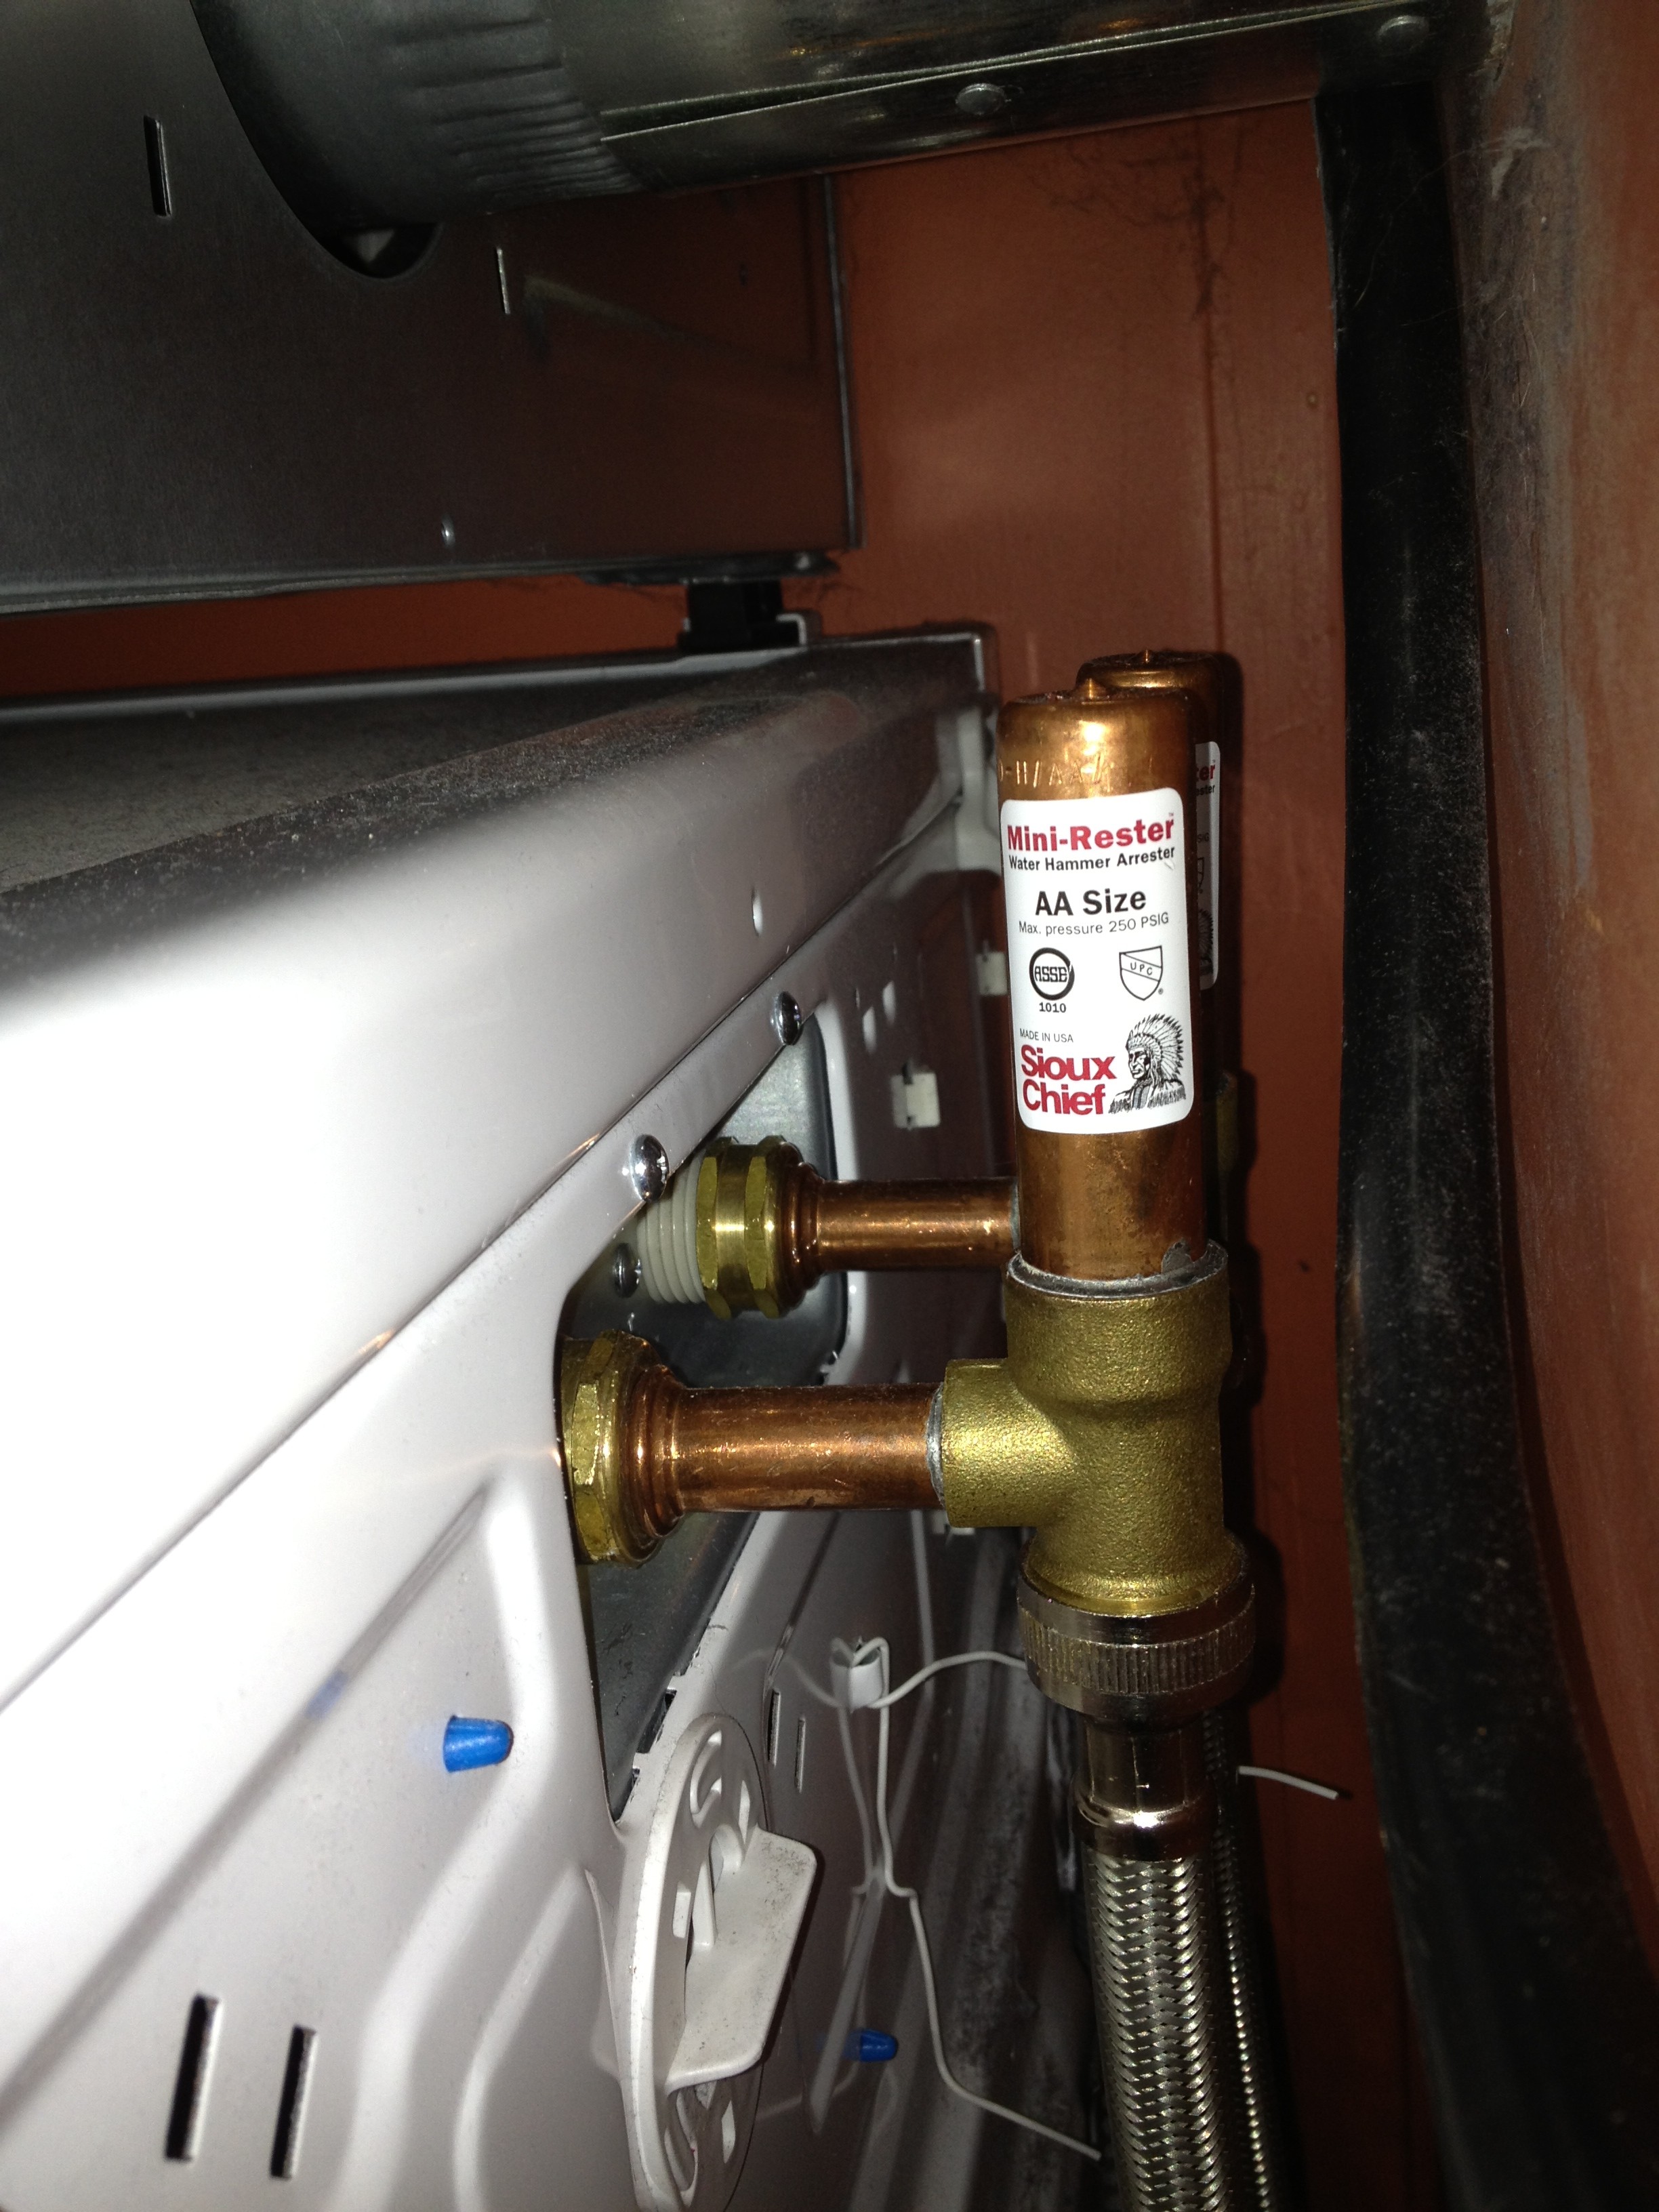
$10 and no more worries that your washing machine is going to rip your pipes out of the wall.
What you need is a water hammer arrestor. You actually need two ($20 total), one for each intake hose — and no more jackhammering. But, while you’re flailing away behind the washing machine:
- Is the dryer supposed to be venting so much exhaust into the laundry room?
While installing the water hammer arrestors I discovered that the dryer’s exhaust vent wasn’t flush with the exhaust pipe leading to the outside. (“Discovered” by noticing that there was lint everywhere behind the dryer.) Although much of the hot, humid, lint-filled dryer exhaust correctly went outside, some of the hot, humid, lint-filled air was staying inside and slowly coating the back of the dryer, the wall, the floor, and the hoses with hot and humid lint.
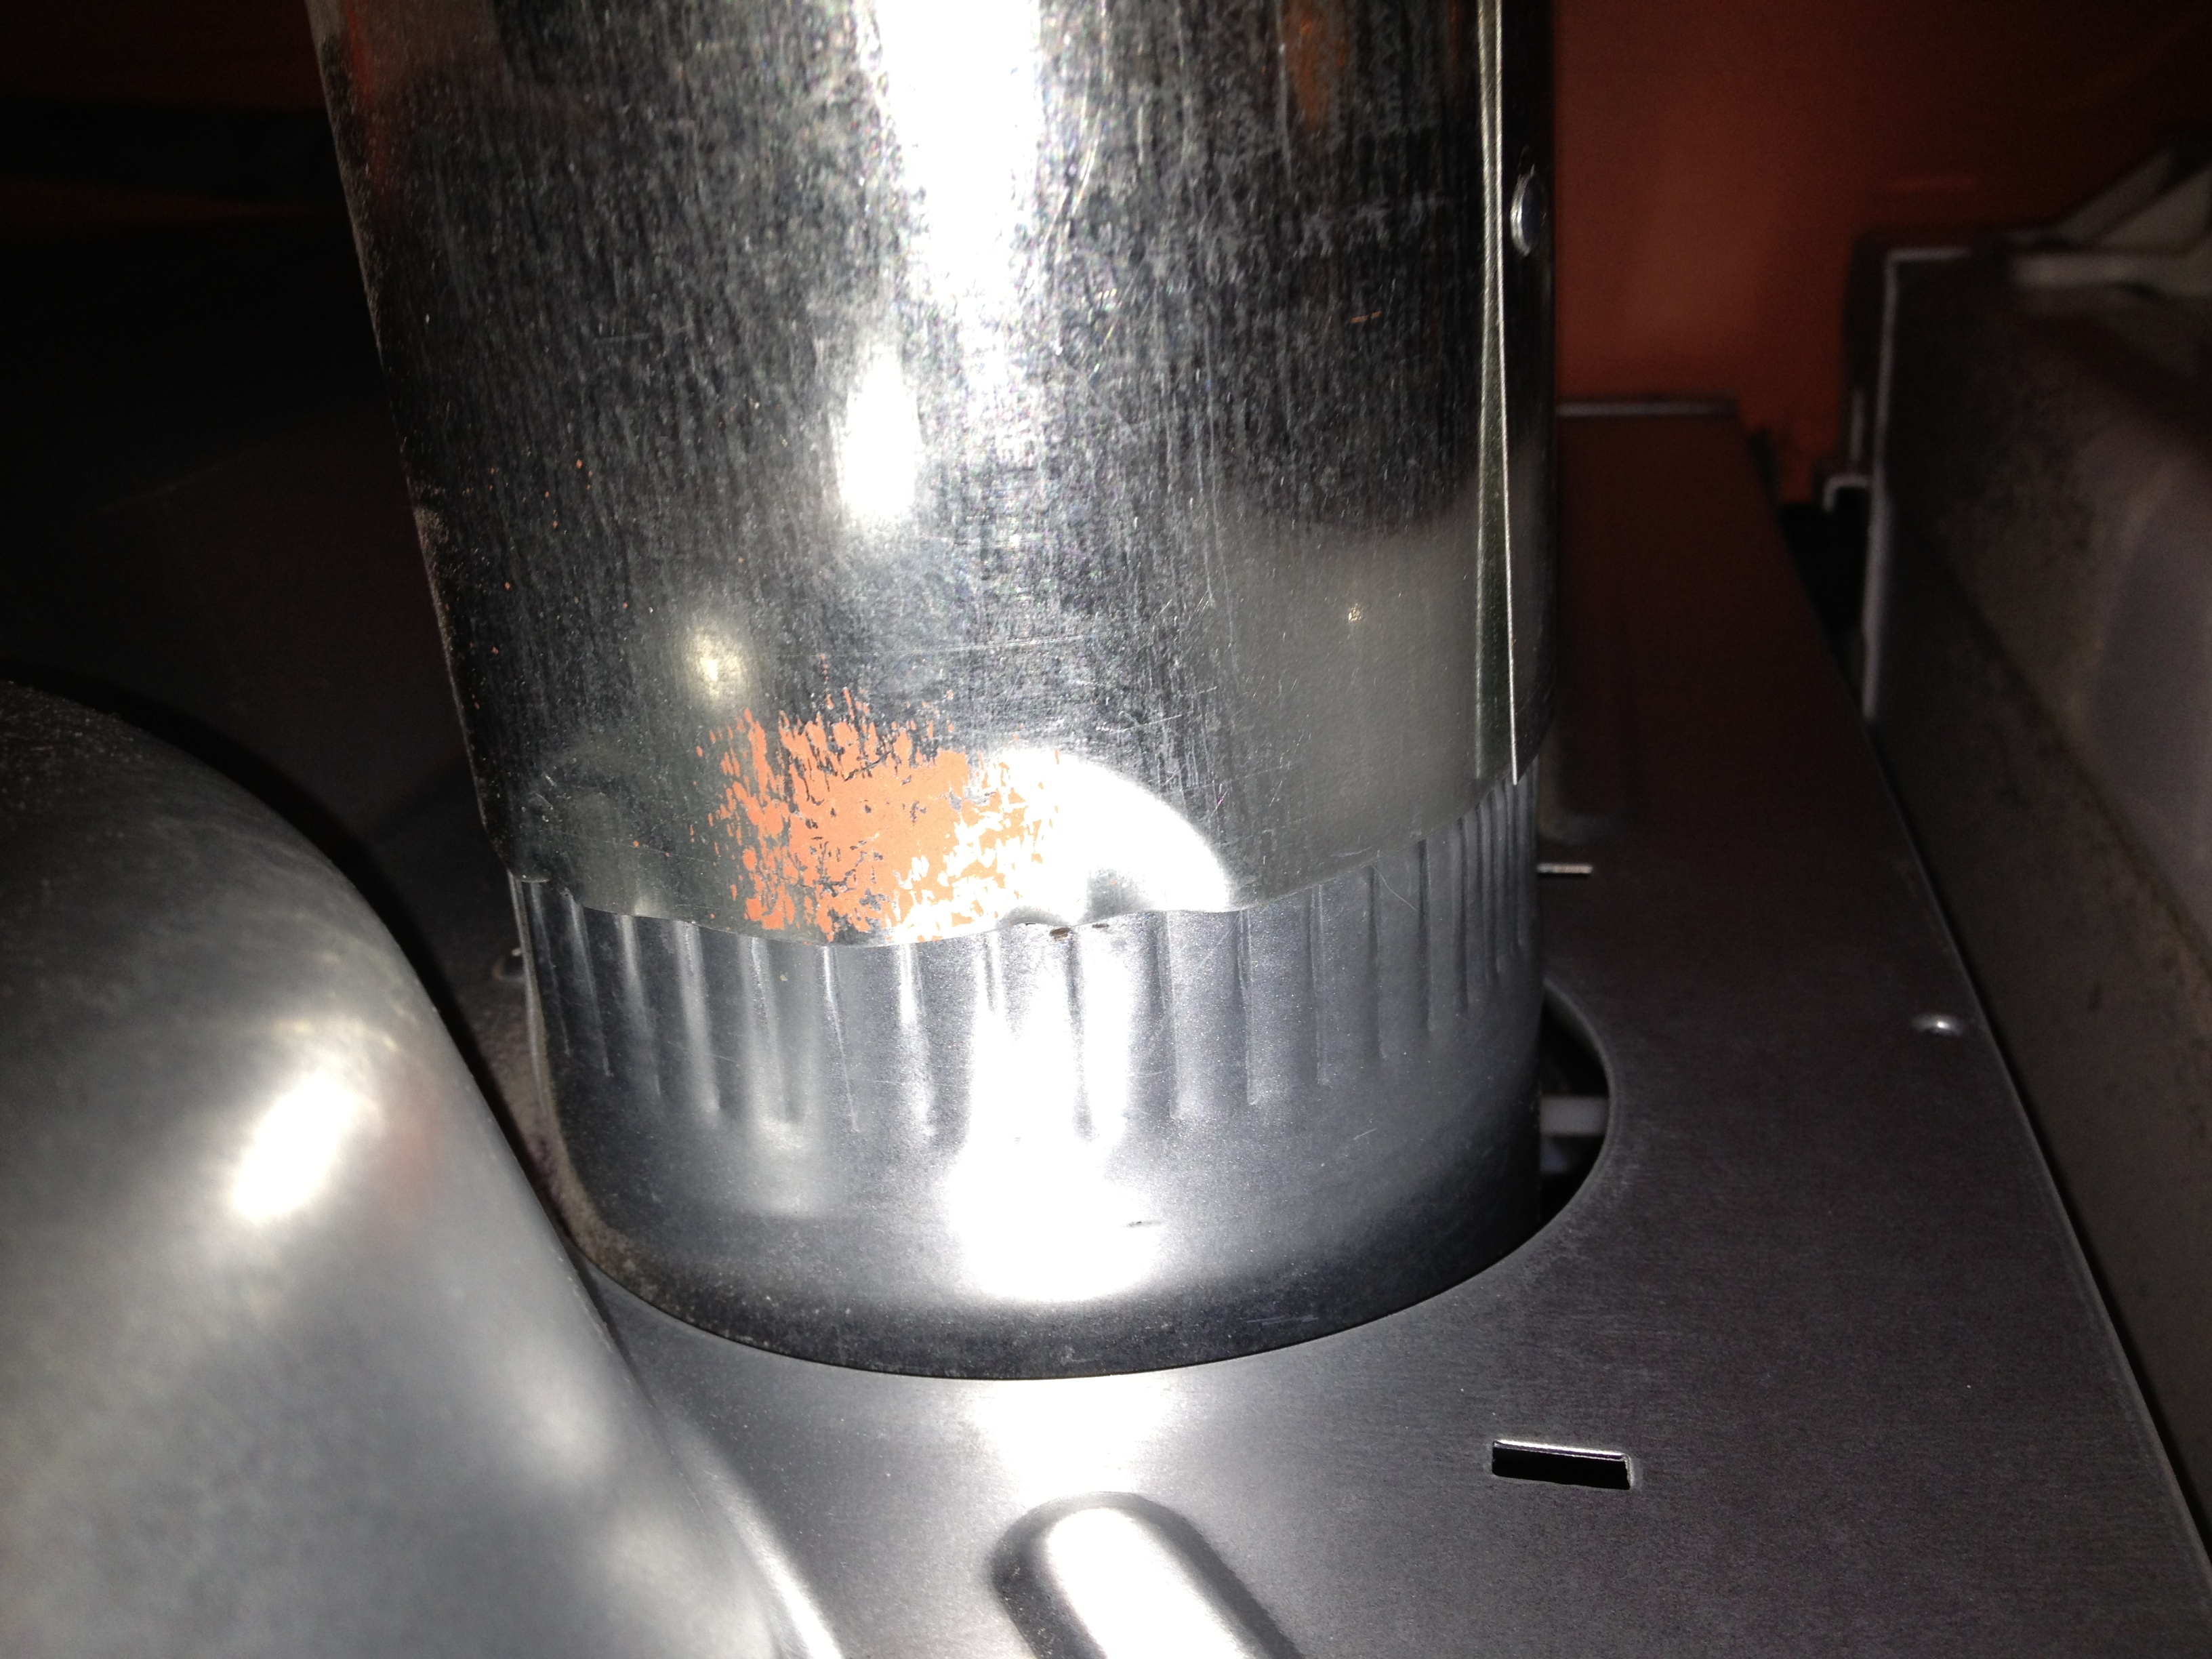
The ruffled pipe on the left is correctly inserted into the exhaust pipe on the right. When incorrectly non-inserted (not shown), some of that warm moist air unsurprisingly flows back into the laundry room.
It was pretty easy to fix by moving the dryer so that the pipes lined up correctly. My guess is they were knocked out of alignment a few months ago when the insulation contractors were busy drilling holes in the walls and pumping them full of cellulose.
But the larger lesson for me is that nobody is going to come knocking on our front door asking to check whether our dryer is venting correctly. Gone are the days when some faceless property management company dropped by periodically to take care of these kinds of things. So I’m making an effort to look behind things (like the kitchen stove), or underneath things (like the refrigerator coils), or around things (like the toilet flush mechanism), or inside things (like the bathtub drain), to ensure I understand what’s going on and especially to ensure I notice when something isn’t quite right. (It’s surprising how much more you care about fixing a problem when it’s your problem instead of being your landlord’s problem.)
And speaking of venting:
- Is the bathroom fan supposed to be venting so much exhaust into the attic?
The short story here is that the electrical contractors used duct tape to connect the fan exhaust ducts to the roof vents. This image from Lowes.com shows the components that usually route air from your exhaust fan to the outdoors:

Roof vent kit. The middle component is the coupling that would normally connect the hose (upper left) to the vent cap (upper right). Instead of buying this $3 part, our electrical contractor decided to use duct tape, with predictable results. Image source: Lowes.com
It took me months to notice that the contractor had skimped on the coupling; the rest of the installation was very professional. (I did notice that he had wrapped the connection area with duct tape, but I assumed he put it there to support the weight of the hose, not to connect the hose to the cap.) I only discovered it when I noticed a “used bathroom smell” in the stairwell leading to the attic space: The fan was drawing air out of the bathroom and pushing it into the attic, which then pushed it towards the stairwell, then back towards the bathroom. When I checked the attic I discovered that the duct tape on both hoses was failing, causing the hoses to vent partially into the attic space. $6 of parts (and about an hour of cursing and bumping my head) and all is well.
(Side note 1: If I could go back in time, I’d have specifically instructed the contractor to use rigid ducting to exhaust the new fans; I think that would reduce the fan noise even further. I may eventually go in and replace the ducting myself.)
(Side note 2: Putting the bathroom fans on a timer switch is easily one of the most satisfactory modifications that we’ve done to the house. Before we take a shower we simply press the “60 minute” button on the switch and forget about the fan — and we have no more moisture problems in the bathroom. Try it!)
(Side note 3: There is a conventional formula that you can use to determine what capacity [cubic feet per minute, CFM] bathroom exhaust fan you need. I was tempted to get an oversized fan but decided to get exactly the size called for by the formula. My decision was correct: if you install a timer for your bathroom fan, you don’t need an oversized fan.)
- One snow shovel isn’t enough for two people.
Lesson learned: Two snow shovels would have gotten the job done in half the time with twice the fun.
Before the cold season I bought a good-quality plastic shovel for bulk snow removal. Our neighbor later mentioned (correctly) that we also need a square metal shovel to break up and remove ice from the sidewalk, for those days when freezing rain sticks to the walkway and stairs.
Our roofing contractor recommended we get a roof rake because of the shallow slope of the roof over our porch. You use them to rake heavy snow off your roof to avoid potential collapse from the weight of the snow. I ended up being glad we bought one (the rakes are about $50 each, but prevention is cheaper than repair); I ended up using it twice this winter when we had deep snows followed by rain.
- Which bulb to buy?
One nice thing about homeownership is you can finally start thinking in terms of years for things like “what’s the return on investment of buying one of those newfangled expensive light bulbs?”
When we bought the house all the fixtures had incandescent bulbs. When the Mass Save folks came to give us a free energy audit, they replaced all the incandescents with CFLs (for free!) CFLs use about 25% of the energy of incandescent bulbs (lower wattage, less heat) and have a longer service life than incandescents. Unfortunately, CFLs take a few minutes to warm up to full brightness and can be pretty dim for the first few moments after turning them on — fine for some rooms but not really good for places like stairwell lighting. As a test we’ve replaced a couple screw-in CFLs with LED bulbs and so far are very happy with the light distribution, color, and instant-on performance of the LED bulbs.
I also put three low-lumen LED bulbs in an outdoor lamppost to try them out. I ended up writing a review of the bulbs in which I calculated the long-term cost savings you get by buying an $11 LED bulb instead of a $1 incandescent bulb:
These things are advertised as “2700–3000K” but they look much whiter to me — maybe 4000K? — certainly nothing like the warm orange-y color shown in the item description. My only complaint is that they don’t look as pretty as the dimmed 15W incandescent bulbs they replaced (the ones with the nice orange filament glow). But these bulbs don’t look bad, just a little futuristic.
I really like their light intensity of 50 lumens per bulb; I bought them in part because these were the dimmest bulbs I could find. I installed them in a lamppost next to our front steps. The old 110 lumen incandescents were harshly bright on dark evenings, so much so that three of them together hurt my eyes when I glanced at them. These LED bulbs are pleasantly dim (though still too bright to stare at directly) — the bulbs aren’t distracting when viewed from across the street, but they still provide enough illumination to make out the steps.
These bulbs are currently $11/bulb[.] I’m curious to see whether I get the claimed 3-year (30,000-hour) service life out of these LEDs, especially with them being in the outdoor fixture. At current electricity rates, each 1.5W LED bulb costs me $0.92 per year if I leave them on 24/7. So if the bulbs do last three years, then it’ll cost me $4.59 total (bulb cost plus electricity cost) per bulb per year.
It turns out that that’s a bargain in comparison with my old 15W incandescents ($1.09/bulb, 1500-hour service life). A 15-watt bulb costs $9.24 in electricity per year when run continuously, and a 1500-hour service life means you’ll burn through six bulbs each year…so the total cost for incandescents running 24/7 is $14.69 per bulb per year.
(In actual use I only ran the incandescents at night and I had to replace them after about six months. Under that 12-hour “only at night” scenario, the incandescent cost is only $6.80 per bulb per year — but that’s still more expensive than the $4.59/year if I run the LED bulbs full-time. And in an apples-to-apples comparison, if I were to run the LEDs only at night [and if they last six years that way] then the total cost for the LEDs is only $2.75 per bulb per year.)
In order to get these bulbs to work I had to screw them in more tightly than I’d had to with the incandescent bulbs. At first they didn’t light up and I worried that I’d received three dead bulbs, but it turns out that a little extra torque fixed the problem.
Most of the LED bulbs we’ve bought have a smaller “candelabra” base. One downside to both the CFL and LED screw-in bulbs in the candelabra form factor is their large size relative to incandescent bulbs. The CFL and LED candelabra bulbs we have are surprisingly larger than the incandescent bulbs they replace — which makes sense in order to squeeze in the extra circuitry, but which made it challenging to fit the newer bulbs into candelabra-sized wall fixtures.


